

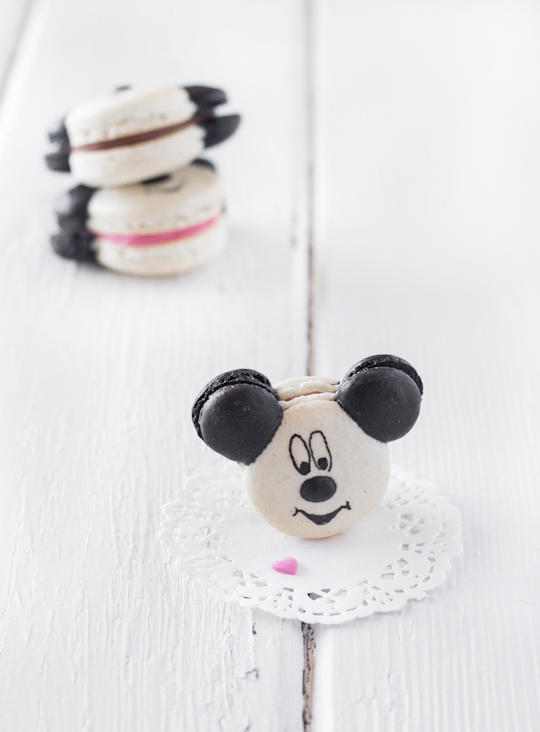
You know how much I love a gimmicky macaron. This blog is full of them. They might horrify some of the macaron purists out there but I can't resist them. Macarons are still cookies and we shouldn't take them too seriously. Even so, I was planning to avoid making the cutesy animal faced ones for a while. They've been done. But then my super cute sister-in-law asked if I could make some macarons for her Disney-themed party (along with another one of these Sweet 16 cakes), and it was too fun an idea to pass up. Mickey Mouse macarons seemed like the perfect treat for a Disney party.
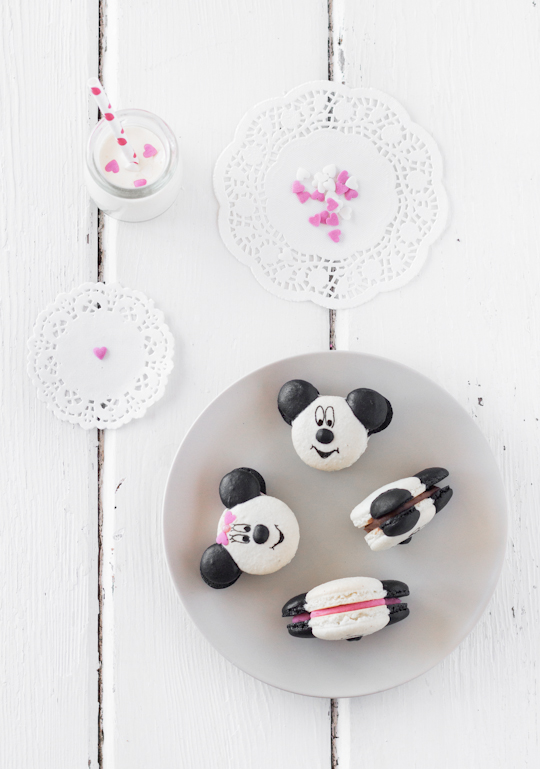
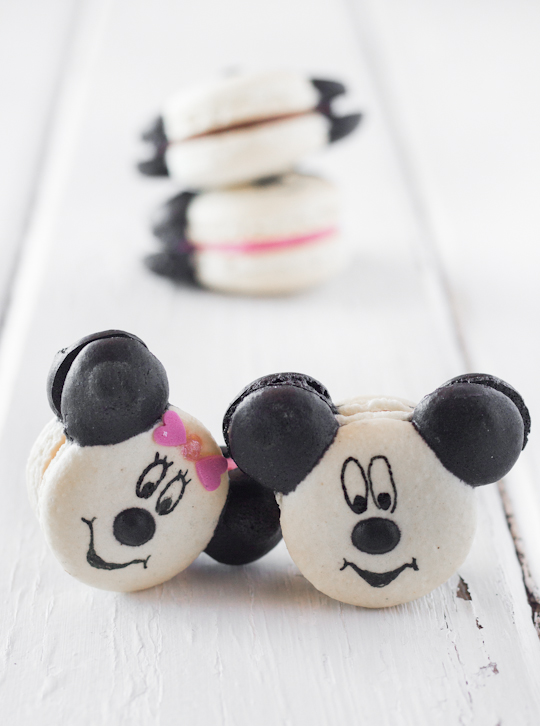
I made two batches; Milk Chocolate Mickey Mouse Macarons and Strawberry Minnie Mouse Macarons. I've gotta say that I love the Minnies just a little bit more with the little pink bow and the eyelashes. Plus the strawberry ganache is amazing. I wanted the strawberry flavour to be very obvious so I cheated a little and added some strawberry essence to the ganache even though it already has strawberry puree. It makes it taste just like the strawberry flavoured chocolate you can find in Asian supermarkets, which I have a serious soft spot for.
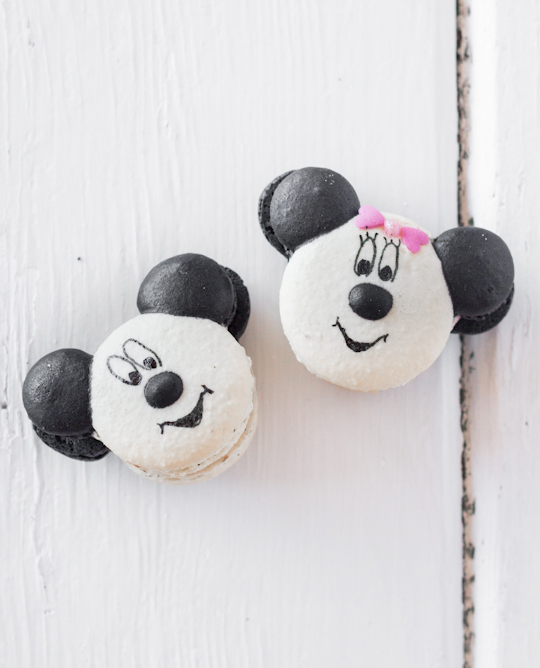
I had a quick look on Google, figuring that Mickey Mouse macarons would have been done to death by other bakers already since the round shapes make it pretty easy to pipe. Surprisingly there weren't many around, I thought these ones were particularly impressive but I wanted to make something a little less complicated. So I went with just a plain white shell with black ears and a nose, and drew on the faces with black food colouring after baking like I normally do. I found it really hard to get the eyes right, the first few I drew ended up looking more than pandas than Mickey or Minnie. But I think by the end I nearly got the hang of it.
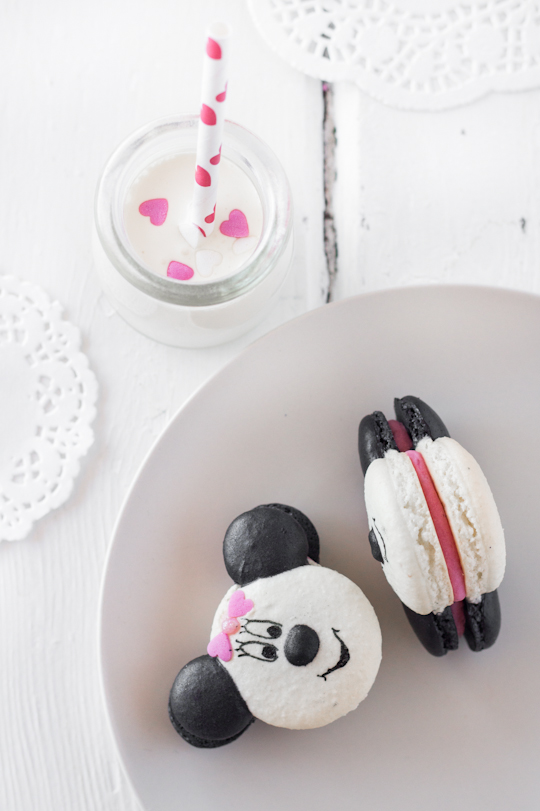
As always, I'd recommend practicing with plain macaron shells until you're comfortable enough to give these a try. Splitting up the batter into two colours, the piping of the ears and nose, and the sprinkles on top make this macaron very susceptible to cracking so they need to be dried for a bit longer than normal macs. Mine still cracked a little around the ears because I had to use liquid black food colouring instead of gel or powder, but the majority of them turned out pretty good. Just don't make my mistake of using soft sugar pearls on the bows instead of the cachous, they tend to disintegrate in the oven. The important thing was the birthday girl was stoked with them and I hear they disappeared pretty fast at the party.
Milk Chocolate Mickey Mouse Macarons and Strawberry Minnie Mouse Macarons
For one batch of 10-12 of macarons, double amounts if you are making two batches: (if you are a beginner with macarons, read up and practice plain macarons first. BraveTart has lots of useful advice and info on the subject)
100g egg whites, at room temperature
1/2 tsp salt
110g almond meal, at room temperature and well sifted
200g icing (confectioner's) sugar
50g sugar (I use caster/superfine)
Optional: 1 tsp powdered egg whites (available from The Essential Ingredient), helps to stabilise egg whites but is not necessary, black food colouring (preferably gel or powdered)
Line two baking trays with good quality baking paper. Place icing sugar in food processor and pulse for a minute to remove any lumps. Stir in almond meal and pulse for about 30 seconds to combine. (If you don’t have a processor just sift together with a fine sieve.) Sift into a large mixing bowl and set aside. Using an electric mixer, beat egg whites and salt (and egg white powder) in a medium mixing bowl until it reaches soft peaks. With the mixer on high speed, gradually add sugar and beat until it reaches stiff peaks.
Add meringue to your dry mixture and mix together with a spatula, quickly at first to break down the bubbles in the egg white (you really want to beat all the large bubbles out of the mixture, which is easily done by smearing the mixture on the bottom and side of the bowl with your spatula), (as it just starts to come together you can place about 1/3 of the mixture in a separate bowl and add black food colouring to it) then mix carefully as the dry mixture becomes incorporated and it starts to become shiny again. Take care not to overmix, the mixture should flow like lava and a streak of mixture spread over the surface of the rest of the mixture should disappear after about 30 seconds.
Place white mixture in a piping bag with a 1cm round piping tip. Pipe rounds about 2.5cm diameter on your prepared trays, leaving at least 3cm space around each one. Tap baking sheets carefully and firmly on the benchtop a couple times to remove any large bubbles. Place your black piping mixture in a bag with a narrow round piping tip (2-5mm) and pipe the ears ( you can pipe a small dot in the middle for the nose on half the shells, remember half will have faces and half will not). If you are decorating for Minnie Mouse macarons, use heart-shaped sprinkles and pink cachous to create a small pink bow decoration. Leave to dry for at least an hour, so that when you press the surface of one gently it does not break/stick to your finger. This will help prevent any cracking and help the feet to form on the macs.
Preheat your oven to 130-150°C (265-300°F), depending on your oven. You can place the sheet of piped shells on top of an upside-down roasting tray or another baking tray, for better heat distribution. Bake for 20-25 minutes, depending on the size of your shells. Carefully test if the base of the shell is ready by gently lifting one and if it’s still soft and sticking to the baking paper, then it needs to bake for a few minutes longer. Remove from the oven and cool on the tray for a few minutes, then gently remove from the sheet and place on a wire rack to cool. At this point you can use a wooden skewer dipped in black food colouring or an black edible ink pen to draw on the eyes and mouth on the shells that have noses. Leave to cool completely on rack.

For the milk chocolate ganache (for Mickey):
100g good quality milk chocolate, finely chopped
75ml pure/heavy cream (min 35% fat unthickened)
For the strawberry white chocolate ganache (for Minnie):
100g good quality white chocolate, finely chopped
75ml pure/heavy cream (min 35% fat unthickened)
60g (about 1/4 of a punnet) fresh/frozen strawberries, pureed
Optional: 1-2 tsp of strawberry essence
For both flavours of ganache, place chopped chocolate in a bowl and set aside. Heat cream in a small saucepan on medium-low heat until it just comes to the boil and then pour over the chocolate. Leave for about 3 minutes to allow chocolate to melt. Use a whisk to combine mixture until it is smooth. For the strawberry ganache, gradually whisk strawberry puree into the white chocolate ganache and then add strawberry essence to taste. Chill both ganaches, whisking it every 5 minutes to ensure it stays smooth, until the mixtures thicken but are still pipable. Place in small piping bags (ziplock bags with a corner snipped off are handy for this) and fill macaron shells, using the strawberry ganache for the Minnie Mouse macarons and chocolate ganache for the Mickey Mouse macarons.


0 comments:
Post a Comment