The December 2009 Daring Bakers’ challenge was brought to you by Anna of Very Small Anna and Y of Lemonpi. They chose to challenge Daring Bakers’ everywhere to bake and assemble a gingerbread house from scratch. They chose recipes from Good Housekeeping and from The Great Scandinavian Baking Book as the challenge recipes.
When I saw that the challenge for December was Gingerbread Houses I had two immediate thoughts. The first was, "What a fabulous Christmas challenge!" and the second was something along the lines of "BAHHH!!!" because I had JUST finished making my very simple, children-friendly mini gingerbread houses. A lot of my friends urged me to just save my mini houses and present them as my completed challenge for this month, but that didn't feel right. The whole point of those mini ones was their simplicity, and there was no challenge there for me. I wanted to be more daring! So I decided to have a little fun...
I struggled for the first week deciding what to do. I have mentioned time and time again that I am a messy baker, so I knew that I couldn't expect myself to come up with a delicate masterpiece or anything. Then Asian Gaga semi-jokingly said to me 'Make a gingerbread igloo!', to which I paused and then replied 'YOU ARE A GENIUS!'.
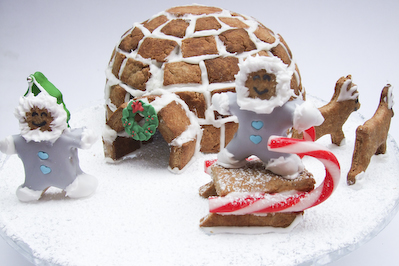
Now, I could have gone the lazy, more sane way about this and just done a whole piece of gingerbread moulded around a bowl. But where is the fun in that?! I was going to really make an igloo. From scratch. From blocks of gingerbread rather than blocks of ice. And it was going to work dammit! AND there would be little gingerbread eskimos! With furry collars! On sleighs!
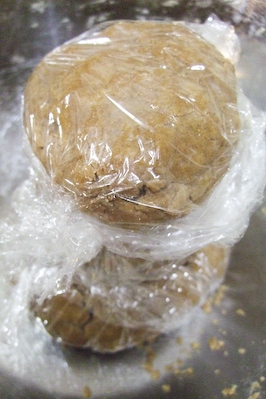
My friends looked at me like I was crazy. They couldn't understand why I would attempt something so messy if I was already such a messy baker. But that's part of the fun of being a Daring Baker right? To challenge yourself to do something you wouldn't have done otherwise? So I plowed on with my plans, and though they weren't very well formed, I started. I used Y's recipe for the gingerbread, but I had a few issues with it at first. I think I must have added wayyyy too much flour, because the dough was super dry and wouldn't come together at all, but I've been in that situation enough that I didn't panic, and just kept adding water until it came together. I also split it up into about 5 separate portions, to make it easier to work with my hands and get the right amount of moisture in the dough. Even so, after being in the fridge overnight, the dough was like a rock, so I took it out and let it soften for a few hours before I started to work with it.
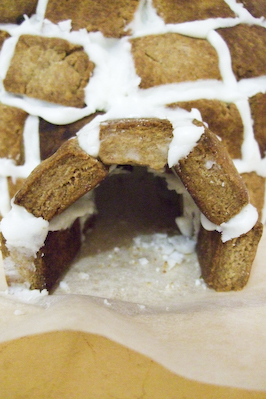
The dough wasn't too friendly to me, the scraps didn't take well to being re-rolled and so a lot of my little gingerbread tiles for the igloo had ugly cracks in them. But I wasn't too fussed, I'm not a perfectionist. Overall, the very firm gingerbread made it easier to carve into nice pieces that fit into the igloo, without having to worry about it crumbling. I did make the big mistake of leaving big gaps at the front, making it much messier-looking than the back, because I assumed I would be covering it up with the front 'tunnel' entrance. I stupidly did not think about the fact that the tunnel entrance would only go so high, so that is why it looks all wonky right above the entrance.
Y's Recipe:
Scandinavian Gingerbread (Pepparkakstuga)
(from The Great Scandinavian Baking Book by Beatrice Ojakangas)
1 cup butter, room temperature [226g]
1 cup brown sugar, well packed [220g]
2 tablespoons cinnamon
4 teaspoons ground ginger
3 teaspoons ground cloves
2 teaspoons baking soda
½ cup boiling water
5 cups all-purpose flour [875g]
(See end of post)
Royal Icing:
1 large egg white
2 cups icing sugar
1. In a large bowl, cream the butter and sugar until blended. Add the cinnamon, ginger and cloves. Mix the baking soda with the boiling water and add to the dough along with the flour. Mix to make a stiff dough. If necessary add more water, a tablespoon at a time. Chill 2 hours or overnight. (I had to add about 5 extra tablespoons of water, and even so the dough was still very stiff the next day)
2. Cut patterns for the house, making patterns for the roof, front walls, gabled walls, chimney and door out of cardboard. (I didn't need to do this)
3. Roll the dough out on a large, ungreased baking sheet and place the patterns on the dough. Mark off the various pieces with a knife, but leave the pieces in place. (I didn't need to do this either)
Now, you can build up your igloo around a foil covered bowl if it makes it easier for you, but I only used the bowl to get a good idea of how many gingerbread tiles I would need to construct my igloo. Once I had the right size for my base, I removed the bowl because I was scared of it getting stuck to the royal icing and all kinds of drama trying to lift the igloo off the bowl later.
Beat egg white with an electric beater until soft peaks form and then gradually add the icing sugar. Put mixture in a piping bag and pipe royal icing along the edges of some gingerbread bricks and stick them together to form the base. Leave to dry until it is just set.
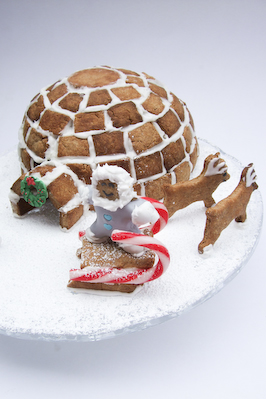
Pipe royal icing on one edge and the bottom of your tiles, and slowly build up your igloo, curving the tiles more inwards the higher it gets. Closer to the top it will be harder to make your tiles sit at the correct angle while the icing is still well, so I used a wooden skewer as a strut to hold it in place until the icing set. The more it angles inwards, the more you will need to alternate regular tiles with those that you have carved with the angled sides earlier. Any gaps are easily filled with more icing. When it gets to the top, it should be almost angled parallel to the floor you won't be able to fit another layer of bricks in. Cut a circle of gingerbread from the remaining dough that will fit in nicely at the top, bake and then cement in using royal icing.
To make the door, just glue together several pieces in an arch at the base of the igloo. You don't need to leave a gap for the entrance on the main part of the igloo if you don't want to. I actually removed a brick from the base after I decided where my entrance was going to be, which was risky!
Use the remaining gingerbread dough (there should be a bit less than half left) to cut out extra decorations for your igloo. I cut out some reindeer...
So that they could pull a sleigh which I built out of mini candy canes and some pieces of gingerbread. I tried to curve up one end of the base of the sleigh by baking it against the side of a baking tray but it wasn't very obvious once it came out of the oven.
I also cut out gingerbread men which I decorated with 'frilly' royal icing to make a fur coat, easily done using a small star tip on my piping bag, black food colouring for the face and I added some of the black to the royal icing for the body so they could have cute little grey outfits :D
I also added a couple extra bits, a sugar wreath for the entrance (which you might recognise from the mini gingerbread houses) and a gingerbread christmas tree decorated with green and white royal icing. I wish I had saved some of my christmas tree cupcakes to decorate this with!
I served it on a cake platter dusted with lots of icing sugar, which makes the perfect snowy setting, and even better if you accidently leave tracks in the 'snow' to make it look like footprints!
Thank you so much to Anna and Y for picking this wonderfully fun challenge for this month. I was so tired after constructing my igloo that I got really lazy with decorating it for the photos, so it's a fair bit uglier than I wanted. I wish I could redo it and move the entrance to the other side of the igloo where I had tiled the gingerbread much more neatly! But you get the general idea of what I was going for, right? :) Merry Christmas everyone!
P.S. For those who are wondering, I don't think I'll be eating it! I definitely should have added more water or butter to the dough, because it's very very dry and does not make great eating unfortunately :( But you might have better luck with the recipe than I did. However if you do want a gingerbread that I would definitely eat you can try the recipe for my other gingerbread houses!
When I saw that the challenge for December was Gingerbread Houses I had two immediate thoughts. The first was, "What a fabulous Christmas challenge!" and the second was something along the lines of "BAHHH!!!" because I had JUST finished making my very simple, children-friendly mini gingerbread houses. A lot of my friends urged me to just save my mini houses and present them as my completed challenge for this month, but that didn't feel right. The whole point of those mini ones was their simplicity, and there was no challenge there for me. I wanted to be more daring! So I decided to have a little fun...
I struggled for the first week deciding what to do. I have mentioned time and time again that I am a messy baker, so I knew that I couldn't expect myself to come up with a delicate masterpiece or anything. Then Asian Gaga semi-jokingly said to me 'Make a gingerbread igloo!', to which I paused and then replied 'YOU ARE A GENIUS!'.
Now, I could have gone the lazy, more sane way about this and just done a whole piece of gingerbread moulded around a bowl. But where is the fun in that?! I was going to really make an igloo. From scratch. From blocks of gingerbread rather than blocks of ice. And it was going to work dammit! AND there would be little gingerbread eskimos! With furry collars! On sleighs!
My friends looked at me like I was crazy. They couldn't understand why I would attempt something so messy if I was already such a messy baker. But that's part of the fun of being a Daring Baker right? To challenge yourself to do something you wouldn't have done otherwise? So I plowed on with my plans, and though they weren't very well formed, I started. I used Y's recipe for the gingerbread, but I had a few issues with it at first. I think I must have added wayyyy too much flour, because the dough was super dry and wouldn't come together at all, but I've been in that situation enough that I didn't panic, and just kept adding water until it came together. I also split it up into about 5 separate portions, to make it easier to work with my hands and get the right amount of moisture in the dough. Even so, after being in the fridge overnight, the dough was like a rock, so I took it out and let it soften for a few hours before I started to work with it.
The dough wasn't too friendly to me, the scraps didn't take well to being re-rolled and so a lot of my little gingerbread tiles for the igloo had ugly cracks in them. But I wasn't too fussed, I'm not a perfectionist. Overall, the very firm gingerbread made it easier to carve into nice pieces that fit into the igloo, without having to worry about it crumbling. I did make the big mistake of leaving big gaps at the front, making it much messier-looking than the back, because I assumed I would be covering it up with the front 'tunnel' entrance. I stupidly did not think about the fact that the tunnel entrance would only go so high, so that is why it looks all wonky right above the entrance.
Scandinavian Gingerbread (Pepparkakstuga)
(from The Great Scandinavian Baking Book by Beatrice Ojakangas)
1 cup butter, room temperature [226g]
1 cup brown sugar, well packed [220g]
2 tablespoons cinnamon
4 teaspoons ground ginger
3 teaspoons ground cloves
2 teaspoons baking soda
½ cup boiling water
5 cups all-purpose flour [875g]
Royal Icing:
1 large egg white
2 cups icing sugar
1. In a large bowl, cream the butter and sugar until blended. Add the cinnamon, ginger and cloves. Mix the baking soda with the boiling water and add to the dough along with the flour. Mix to make a stiff dough. If necessary add more water, a tablespoon at a time. Chill 2 hours or overnight. (I had to add about 5 extra tablespoons of water, and even so the dough was still very stiff the next day)
2. Cut patterns for the house, making patterns for the roof, front walls, gabled walls, chimney and door out of cardboard. (I didn't need to do this)
3. Roll the dough out on a large, ungreased baking sheet and place the patterns on the dough. Mark off the various pieces with a knife, but leave the pieces in place. (I didn't need to do this either)
4. I rolled out the dough on a floured bench, roughly 1 cm thick (which allows for fact that the dough puffs a little when baked), cut required shapes and transferred these to the baking sheet. Any scraps I saved and rerolled at the end. (I used a ruler to cut rows of 2cm x 3cm blocks)
5. Preheat the oven to 375'F (190'C). Bake for 12 to 15 minutes until the cookie dough feels firm. After baking, again place the pattern on top of the gingerbread and trim the shapes, cutting the edges with a straight-edged knife. (I trimmed a few bricks to have edgest slanting inwards, to make it easier to fit them together as they started to curve inwards close to the top of the igloo) Leave to cool on the baking sheet.Now, you can build up your igloo around a foil covered bowl if it makes it easier for you, but I only used the bowl to get a good idea of how many gingerbread tiles I would need to construct my igloo. Once I had the right size for my base, I removed the bowl because I was scared of it getting stuck to the royal icing and all kinds of drama trying to lift the igloo off the bowl later.
Beat egg white with an electric beater until soft peaks form and then gradually add the icing sugar. Put mixture in a piping bag and pipe royal icing along the edges of some gingerbread bricks and stick them together to form the base. Leave to dry until it is just set.
Pipe royal icing on one edge and the bottom of your tiles, and slowly build up your igloo, curving the tiles more inwards the higher it gets. Closer to the top it will be harder to make your tiles sit at the correct angle while the icing is still well, so I used a wooden skewer as a strut to hold it in place until the icing set. The more it angles inwards, the more you will need to alternate regular tiles with those that you have carved with the angled sides earlier. Any gaps are easily filled with more icing. When it gets to the top, it should be almost angled parallel to the floor you won't be able to fit another layer of bricks in. Cut a circle of gingerbread from the remaining dough that will fit in nicely at the top, bake and then cement in using royal icing.
To make the door, just glue together several pieces in an arch at the base of the igloo. You don't need to leave a gap for the entrance on the main part of the igloo if you don't want to. I actually removed a brick from the base after I decided where my entrance was going to be, which was risky!
Use the remaining gingerbread dough (there should be a bit less than half left) to cut out extra decorations for your igloo. I cut out some reindeer...
So that they could pull a sleigh which I built out of mini candy canes and some pieces of gingerbread. I tried to curve up one end of the base of the sleigh by baking it against the side of a baking tray but it wasn't very obvious once it came out of the oven.
I also cut out gingerbread men which I decorated with 'frilly' royal icing to make a fur coat, easily done using a small star tip on my piping bag, black food colouring for the face and I added some of the black to the royal icing for the body so they could have cute little grey outfits :D
I also added a couple extra bits, a sugar wreath for the entrance (which you might recognise from the mini gingerbread houses) and a gingerbread christmas tree decorated with green and white royal icing. I wish I had saved some of my christmas tree cupcakes to decorate this with!
I served it on a cake platter dusted with lots of icing sugar, which makes the perfect snowy setting, and even better if you accidently leave tracks in the 'snow' to make it look like footprints!
Thank you so much to Anna and Y for picking this wonderfully fun challenge for this month. I was so tired after constructing my igloo that I got really lazy with decorating it for the photos, so it's a fair bit uglier than I wanted. I wish I could redo it and move the entrance to the other side of the igloo where I had tiled the gingerbread much more neatly! But you get the general idea of what I was going for, right? :) Merry Christmas everyone!
P.S. For those who are wondering, I don't think I'll be eating it! I definitely should have added more water or butter to the dough, because it's very very dry and does not make great eating unfortunately :( But you might have better luck with the recipe than I did. However if you do want a gingerbread that I would definitely eat you can try the recipe for my other gingerbread houses!


0 comments:
Post a Comment