In case you haven't noticed, I am
not a neat baker. 'Rustic' is about as kindly as you can describe my decorating style. It's just how I am, no matter how hard I try to be neat and precise and pretty with my presentation, I end up with either 'rustic' or 'freeform'. As a child I could never colour inside the lines, my handwriting was totally inconsistent and my hair was always out of place. So it comes as no surprise to me that layer cakes are an enemy of mine when it comes to baking. I can never get those perfectly straight, clean and neat layers with a smooth layer of icing between and on top. My kitchen usually ends up covered in cake cut offs and random extra blobs of icing that have been slung off my spatula in frustration.
When I heard Regex Man's birthday was coming up I immediately asked him what cake he would like me to bake him. His reply: "Chocolate cake, with chocolate icing." My shoulders slumped ever so slightly and I asked hopefully, "Anything else?"
"Chocolate sprinkles!"
This may come as a surprise, but chocolate is not one of my favourite cake flavours. Are you gasping in shock? I don't know why, I think I prefer my cakes lighter and fluffier than the plain chocolate cakes you usually get (though I totally LOVE chocolate mousse cakes). So I wasn't too excited about baking this cake, until I decided to make things a little bit more exciting with an element of
Adriano Zumbo's now famous chocolate mousse cake which was featured on Masterchef. I have never been game to try making the entire Zumbo cake, but I decided almost as soon as I saw the recipe was up on the website that I would definitely be borrowing 1 or 2 elements in another cake. This seemed like the perfect opportunity to spice up an old-fashioned chocolate cake with a layer Zumbo's salted caramel.
It was easy to choose a chocolate cake recipe. Nigella's old-fashioned chocolate cake was easy and look delightfully moist since it was full of sour cream. In theory it sounded super easy since you just bake two half cakes and sandwich them together with icing and cover with more icing. So all I had to do was substitute the icing in the middle for caramel. Sounds so easy, right? The only thing is, I forgot that it's me we're talking about here, and I can't colour inside the lines. The cakes turned out great, and the icing was perfect. But as I was assembling the cake all hell broke loose. I lifted a cake layer up to my face to have a quick sniff, since I was a little worried I had burnt the top, and the whole cake slid out of the tin and started falling towards my face. I managed to catch it (partly with my face) but it cracked in two. Noooooooooooooooooooooooooooooo.
So I tried to compose myself and kept saying "It's okay, it's cool! You can just cover it with icing and no one will know!" So I placed the two cracked halves on top of the salted caramel and bottom cake layer. And then I started covering it with chocolate icing. This should have been easy peasy but I am slow and fiddly and the icing started to harden before I had smoothed it out, and then the two broken pieces started falling down the sides of the cake, and caramel started leaking out through the icing and OH MY GOD it was starting to look like a poo. I eventually got it sort of smoothish, though a bit messy on the sides, but I was like "No worries, I can cover the sides with sprinkles!", but the sprinkles made it look like a hairy poo. Much swearing ensued as I frantically tried to scrape the sprinkles off and re-smooth the sides. CHOCOLATE SPRINKLES EVERYWHERE.
Anyway. I sort of managed to get it smooth, but it was so plain except for some sprinkles down the bottom. It still sort of looked poo-like, so in a panic I topped it with some raspberries I had in my freezer. It looked okay until the next day, when they defrosted and got all wet, and made it look like the cake was bleeding. Sigh. Anyway, the cake was cut and eaten and enjoyed, and honestly it was really tasty and the salted caramel layer was perfect for it. So I will give you the recipe because I am sure you are not as much of a messy slob as I am. Though a warning, it's terribly bad for you, I would limit yourself to one slice (or two if you're the birthday boy/girl)!
Old-Fashioned Chocolate Cake with a Salted Caramel Layer(cake adapted from Nigella's recipe and caramel from Adriano Zumbo's chocolate mousse cake recipe)For the salted caramel:150g caster sugar
30g glucose
60g water
110g cream
3g gelatine leaves (or powdered gelatine if you can't get it)
60g butter unsalted
2g sea salt flakes
For the cake:300g plain flour
300g caster sugar
1.5 tsp baking powder
3/4 tsp bicarbonate of soda
60g best-quality cocoa
250g soft unsalted butter
3 large eggs
3 tsp real vanilla extract
225ml sour cream
For the icing:75g unsalted butter
175g best quality dark chocolate, broken into small pieces
300g icing sugar
1 tbsp golden syrup
125ml sour cream
1 tsp real vanilla extract
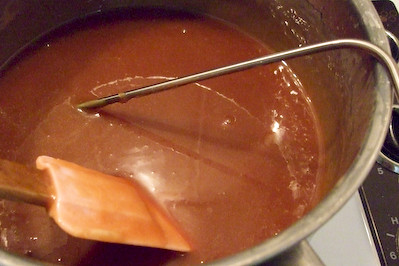
Prepare the caramel layer the night before; Heat cream. Place sugar, glucose, water in a saucepan, cook to caramel colour. This is the part where I am notorious for taking it off the heat too early, so this time I was very patient and waited until I got the deep brown colour I was looking for, while stirring it regularly to stop it burning.
Deglaze sugar with cream (add it gradually and stir vigorously to stop it from bubbling over). Add gelatine (I dissolved my powdered gelatine in a tiny amount of hot water before adding it). Cool to 50°c. Add butter and sea salt flakes and blitz, then place in a silicon mould (or a greased and lined springform tin) of the same size as the one you will be baking your cake layers in, and freeze overnight.
Note: The caramel layer in this photo is double the amount specified, I halved it after seeing how thick it was!
Take everything out of the fridge so that all the ingredients can come to room temperature. Preheat the oven to 180°C and line and butter two 20cm sandwich tins with removable bases. (I used my 21cm spring form tin for all of these)
Place flour, sugar, baking powder and bicarb, cocoa, butter, eggs, vanilla and sour cream – into a food processor and process until you have a smooth, thick batter. If you want to go the long way around, just mix the flour, sugar and leavening agents in a large bowl and beat in the soft butter until you have a combined and creamy mixture. Now whisk together the cocoa, sour cream, vanilla and eggs and beat this into your bowl of mixture.

Divide this batter, using a rubber spatula to help you scrape and spread, into the prepared tins and bake until a cake tester, or a thin skewer, comes out clean, which should be about 35 minutes, but it is wise to start checking at 25. Also, it might make sense to switch the two cakes around in the oven halfway through cooking time. I actually split the amounts in the cake recipe in half and baked the two cakes separately since I only have one tin in the size that I wanted to make. The amounts I have given are for a thick birthday cake, but if you prefer a slightly less enormous cake, follow the amounts in Nigella's original recipe.
One of the broken halves. Sob!
Remove the cakes, in their tins, to a wire rack and let cool for 10 minutes before turning out of their tins. Don’t worry about any cracks as they will easily be covered by the icing later.
To make this icing, melt the butter and chocolate in a good-sized bowl either in the microwave or suspended over a pan of simmering water. Go slowly either way: you don’t want any burning or seizing. While the chocolate and butter are cooling a little, sieve the icing sugar into another bowl. Or, easier still, put the icing sugar into the food processor and blitz. This is by far and away the least tedious way of removing lumps. (I followed the food processor way, I love how easy this was!)
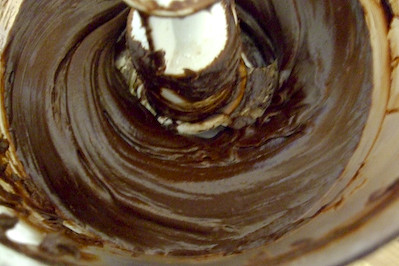
Add the golden syrup to the cooled chocolate mixture, followed by the sour cream and vanilla and then when all this is combined whisk in the sieved icing sugar. Or just pour this mixture down the funnel of the food processor on to the icing sugar, with the motor running. When you’re done, you may need to add a little boiling water – say a teaspoon or so – or indeed some more icing sugar: it depends on whether you need the icing to be runnier or thicker; or indeed it may be right as it is. It should be liquid enough to coat easily, but thick enough not to drip off.
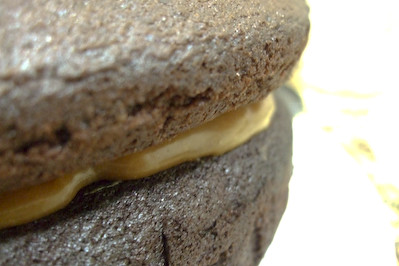
Choose your cake stand or plate and cut out four strips of baking parchment to form a square outline on it (this stops the icing running on to the plate). Then sit one of the cakes, uppermost (ie slightly domed) side down. Remove the caramel layer from the freezer and place on top of your bottom cake layer. If it is too large you can place it on some baking paper and cut around the edge of the caramel with a very sharp knife to its desired shape though it will soften and get very sticky so be careful!
Sit the other cake on top, normal way up, pressing gently to sandwich the two together. Spoon half the icing on to the top of the cake and spread it in a swirly, textured way (though you can go for a smooth finish if you prefer, and have the patience
(which I did not have)). Spread the sides of the cake with the remaining icing and leave a few minutes till set, then carefully pull away the paper strips.
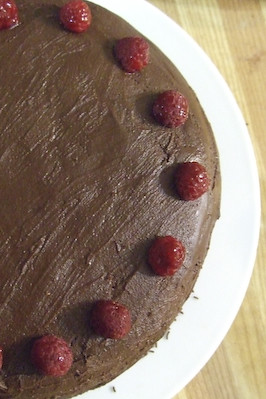
Optional: Decorate with sugar flowers, berries and/or chocolate sprinkles. Please don't do what I did and use frozen raspberries. I knew they didn't work but I was desperate!
In the end, I think Regex Man was very pleased with his cake. And he was very kind to ask me if I wanted to take a photo of the insides after he cut it :) Haha I seem to be training my friends and family well! Everyone
loved the caramel layer, including me. The cake was moist and icing was delicious and the right texture I was looking for. The important part was definitely using really good quality cocoa and chocolate. Obviously layer cakes are still not my friend, I can't even manage two layers! But you never know, things may get better with practice ;)
Happy Birthday Regex Man!


0 comments:
Post a Comment